BIM 360 Field Subcontractors Guide
BIM 360 Field Subcontractors Guide
Steps:
STEP 1: Swinerton will send the email invite from Autodesk to Subcontractor. Autodesk will generate a login password for your email address.
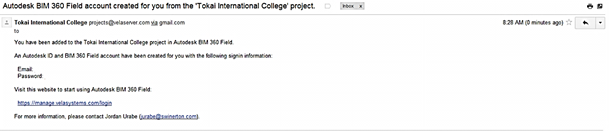
If
you do not accept the first invite and activate your account, you will be sent
reminders to do so.

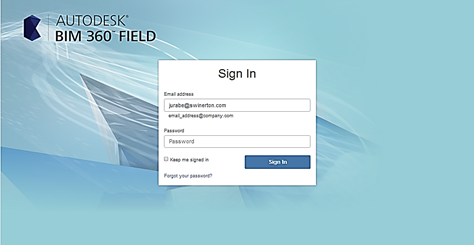
STEP 2: Follow the https://bim360field.autodesk.com/login link to start using the 360 Field web tool.
Sign in with the email address and password provided in the original invite email.
STEP 3: After successfully signing in for the first time, accept the License Agreement.

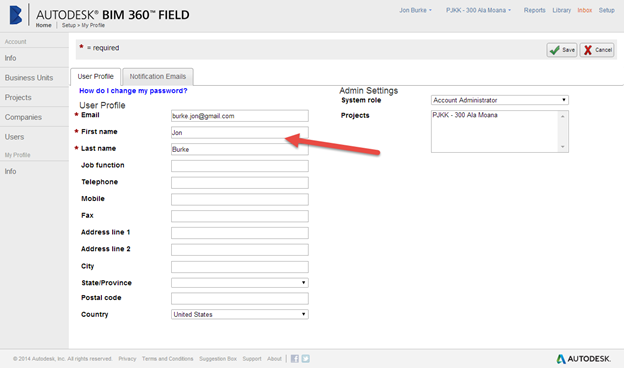
STEP 4: Welcome to the 360 Field Subcontractor web tool! To get started, please go to “Setup” where
you can edit your name and Opt-out of automatic email notifications.
STEP 5: After clicking Setup you will enter User Profile. Please edit your name.
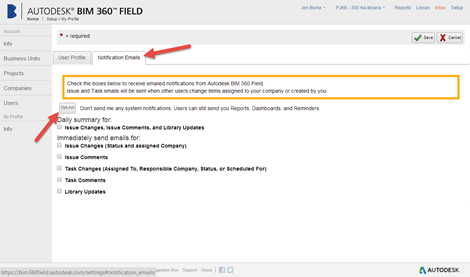
STEP 6: Next, click on the Notification
Emails tab. Then click the Opt-out button.
Opt-out will prevent you from getting instant, email notifications when Issues are generated. As a Subcontractor, you will still receive Issue Log Reports as Swinerton sends them out.
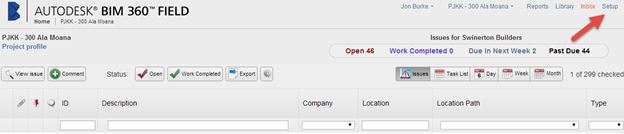
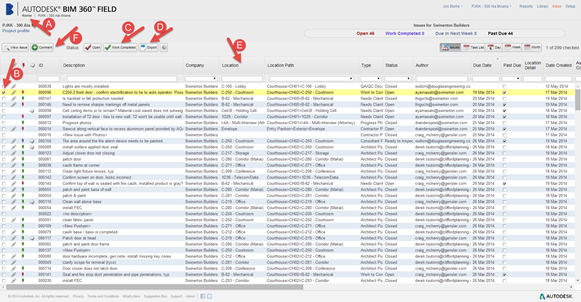
STEP 7: Navigate back to the home screen to view your companies’ issues and use this screen to manage and respond to issues.
a. Click the Home button
b. Select the check box next to the issue you’d like to make as Work Complete
c. Click on the Work Completed button. (You can select multiple issues at once.)
d. Click the Export button to export an excel file with all issues that are currently shown on the screen
e. Use the column headings to filter and organize your list
f. By selecting an issue or multiple issues and clicking the Comment button, you can add a comment to that or those issues
g. There is no need to save, this database saves automatically after every
click
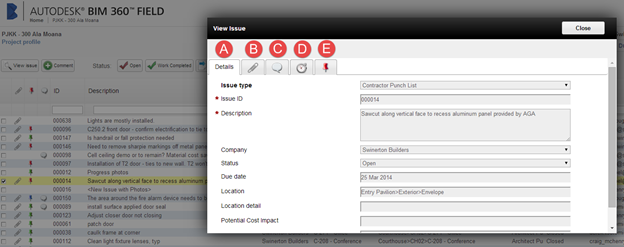
STEP 8: Double click on an issue to view and modify that issues parameters and details
a. The Details tab shows the basic issue information such as Issue Type, Description, Company assigned, Status, Due Date, Location, etc.
b. The Attachments tab will show any pictures that were taken or documents that were uploaded for this issue
c. The Comments tab will show all comments associated with this issue
d. The History tab
keeps track of all changes to the issue
e. The Pushpins tab shows where the issue is in plan view at this specific location