BIM 360 Glue: Using 360 Glue and Field to Manage Equipment Tracking and Commissioning
BIM 360 Glue: Using 360 Glue and Field to Manage Equipment Tracking and
Commissioning
Project
Engineer (BIM)
“BIM
360 Glue and BIM 360 Field administrators can share models between Glue and
Field to facilitate efficient collaboration among the extended project team.
Before
the data can be shared, in BIM 360 Glue, a Glue administrator must set up a BIM
model for sharing by creating Equipment Sets for groups of model objects that
share properties, such as a pipe or duct type.
After
the model is shared with Field, a Field Administrator can then open the model
in Field, and associate the Equipment Sets data to Equipment Properties in the
Field Project. See Managing Equipment Sets.
After
the equipment sets and Field properties are mapped, the team in the field can
update the model with installation status and commissioning information. Team
members using BIM 360 Glue can view equipment properties that have been added
to the model in BIM 360 Field.” From
Autodesk
Steps Involved:
STEP 1: Determine what types of equipment sets
need to be created in BIM 360 Glue (see the available default equipment types
in BIM 360 Field).
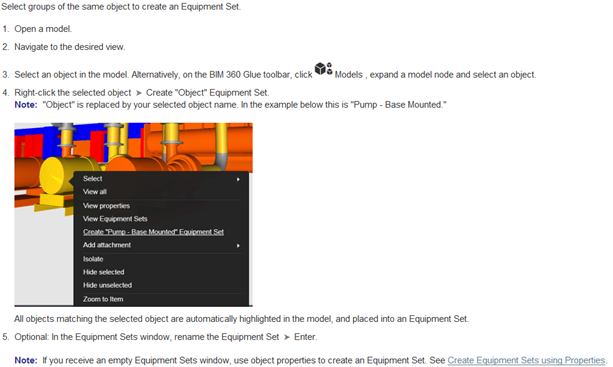
STEP 2: First, equipment sets need to be created
in BIM 360 Glue merged model to be integrated with BIM 360 Field. Create
equipment sets in BIM 360 Glue using:
Objects:
Properties:
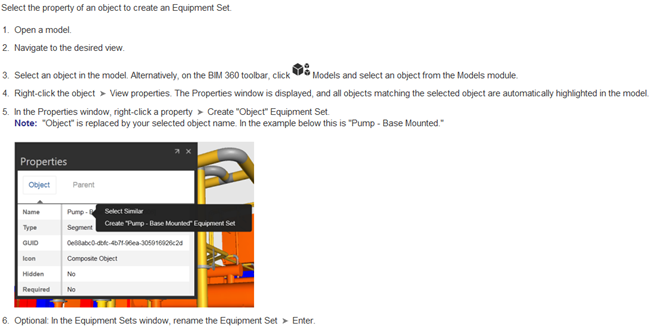
When equipment set is created from a property
of an object, all objects matching the same property in the merged model of BIM
360 Glue will be placed into the equipment set.
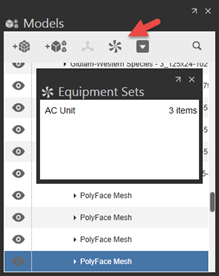
Created equipment sets can be seen here:
STEP 3: Now equipment set has been created in BIM
360 Glue, manual mapping of the particular model with the equipment sets to BIM
360 Field project is required to enable data integration. To map, model must be
enabled to share with Field in BIM 360 Glue.
In Glue:On the BIM 360 Glue toolbar, click
Models

More Actions

Share with
Field.

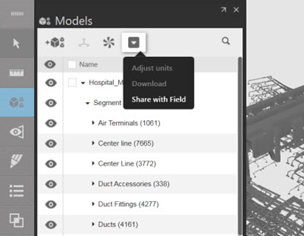
In the Share with BIM 360 Field
dialog, click Yes to overwrite any existing versions of the model, or No to
cancel sharing. A message appears when the model has been shared with
Field.
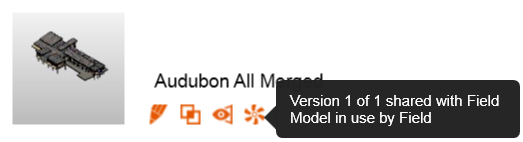
After
sharing a model with BIM 360 Field, a notification will appear in Latest model
activities on the Project Dashboard. This indicates the version of the model
that has been shared, and whether it is currently in use by Field. An orange
icon indicates that the model is in use by Field, and includes version details.
If the model is not in use, the icon is grayed out.
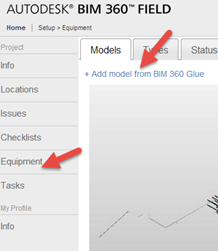
Once the model
is shared with Field, the model must be mapped to the desired Field project
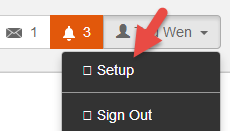
On the project
page of BIM 360 Field web version, click Setup
Click Equipment
and choose the merged model that was Shared with Field in BIM 360 Glue
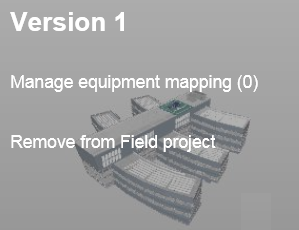
STEP 4: Manage equipment sets:
After you’ve added
a Glue model to your Field project, you can map model object properties. Use
the Manage Equipment Mapping wizard to map the equipment sets created in Glue
to with corresponding Field properties. Only Field administrators can manage
equipment sets.
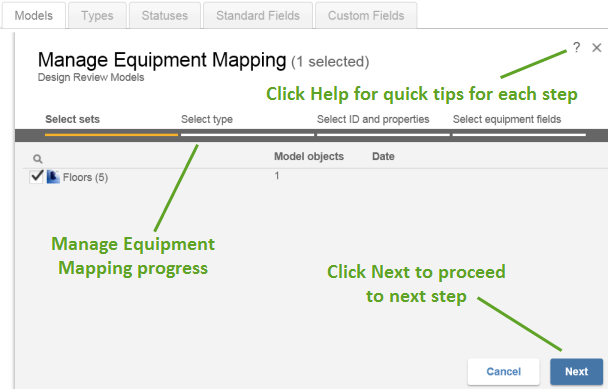
NOTE:
In the Manage Equipment Mapping wizard, click ? (Help) for
quick tips to help you get started.
1. On
the BIM 360 Field home page, in the upper-right, click Setup.
2. In
the navigation panel on the left, click Equipment.
3. Click
the Models tab.
4. Hover over a model's thumbnail and click Manage
Equipment Mapping.
5. In the Manage Equipment Mapping wizard, the
first step is to select the equipment sets to map. You are informed if the
model doesn't have equipment sets.
NOTE: Equipment sets need to be created in BIM 360 Glue by a Glue
administrator.
6. For
Select Sets, select one or more Glue equipment sets to map and click Next. In
the wizard, click Help to display tips for each step.
7. (Optional)
For Select Type, select an equipment type and click Next.
8. The
next step is to select the object identifier (ID). For Select ID and
Properties, select Standard to use the default properties. This is recommended
for most workflows. Select Advanced to create a custom unique ID and model properties.
9. (Optional) If you selected Advanced,
for Select a Unique ID, make your selection and click Next. The next step is to
associate Model properties with Field Equipment Properties. Select a model
property on the left. Then select Chose Field to select an associated Field
equipment property on the right. When done, click Next.
10. For Select Equipment Fields, you can
optionally select equipment properties to add to the model. Any equipment
properties that you add can be viewed in the model's properties in BIM 360
Glue. Click Select Field and in the drop-down select fields to add. When done,
click Save Mapping.
11. In BIM 360 Glue, in the shared model,
equipment properties that have been added in Field can be reviewed. Select a
model object and right-click > View Properties. In the Properties dialog,
select the Equipment tab to view the Equipment properties that were added to
the model.
Below
is Autodesk’s resource on equipment sets using BIM 360 Glue and Field—includes
a short video:
http://help.autodesk.com/view/BIM360/ENU/?guid=GUID-55CEE35A-F24A-45A5-B6BF-B10F01E40DF6
Portion of Information in this except
extracts directly from Autodesk.