Shared Coordinates Process: Acquire and Publish Shared Coordinates
Shared Coordinates Process: Acquire and Publish Shared Coordinates
Steps involved:
STEP 1: Once
the survey file and linked Revit files have been positioned correctly in plane
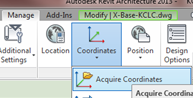
and elevation view, go to site plan view and select Manage
Ribbon>Coordinates>Acquire Coordinates to provide shared coordinates data
from civil survey file to Revit.
STEP 2: Select
the survey file. This records the shared
coordinate system of the Revit site model to match with that of the survey file
(PBP). Note the survey point moves away
from the stationary Project Based Point.
By default, survey point relocates to the origin the survey file where
it was placed after coordinates are acquired.
If the survey file is now moved and “Acquire Coordinates” is selected
again, the shared coordinate system does not change. Once coordinates is acquired, moving the
survey file nor reacquiring the coordinates from the civil survey file does not
affect anything. The civil survey file,
the master file, should be the only file to acquire coordinates from. Note Revit retains the internal project
coordinates system even though it is not displayed.
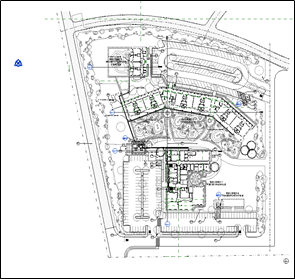
Before Acquiring Coordinates
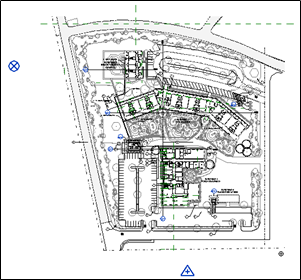
After Acquiring Coordinates
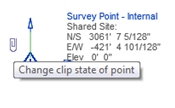
STEP 3: Select
the survey point icon and unclip the paper clip icon. Move/drag the survey point to the
intersection of the reference point of the survey file as defined in Step 2.
Clip back the paper clip icon. When an
unclipped survey point is moved, the shared coordinates do not change except
for the survey point itself. Moving the
survey point to a reference point is for ease of reference when verifying
shared coordinates in Revit with the civil survey file.
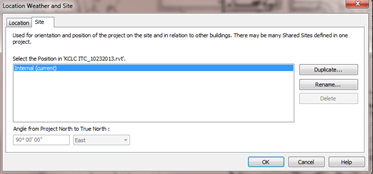
STEP 4: Verify
shared coordinate system of the Revit file has been properly assigned by
ensuring the coordinates at the moved survey point in Revit matches the
coordinates of the reference point location in the civil survey file inside
AutoCAD.
STEP 5: If
coordinate system is not properly assigned or realignment is needed, manually
adjust the linked survey file in Revit to position correctly and reposition the
survey as necessary to match new reference location select “Specify Coordinates
at Point” to manually input the reference location coordinates from AutoCAD.

STEP 6: Select
“Publish Coordinates” and select each of the linked building models in the site
file one at a time. Click “OK” when the
Site dialog box appears. Continue to
click all linked models to push them the shared coordinate system of the site file. The location of the shared coordinate origin
within each of the building model will match to that in the site file. The site model, now inheriting the
coordinates of the survey file, should be the only file to publish site shared
coordinates to the linked building models from.
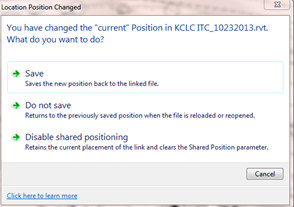
STEP 7: Save
the site file. Prompts will indicate the
current positions of the linked building models have changed. Click the first option, “save” to record the
location of the building models relative to the survey point. The location of the building in reference to
shared coordinates will be recorded back in the linked file. Building files must not be opened when the
new locations are to be saved.
Do:
Prior to moving survey point with the
intention of keeping the shared coordinate system unchanged, always unclip,
move to the desired location and clip back to avoid changing the shared
coordinate system.
Don’ts:
Do not publish site shared coordinates
only to the architectural building files and in the architectural model publish
its shared coordinates to other discipline models linked to the architectural
model. The site file should be the
master file in which all files directly acquire the shared coordinates from.