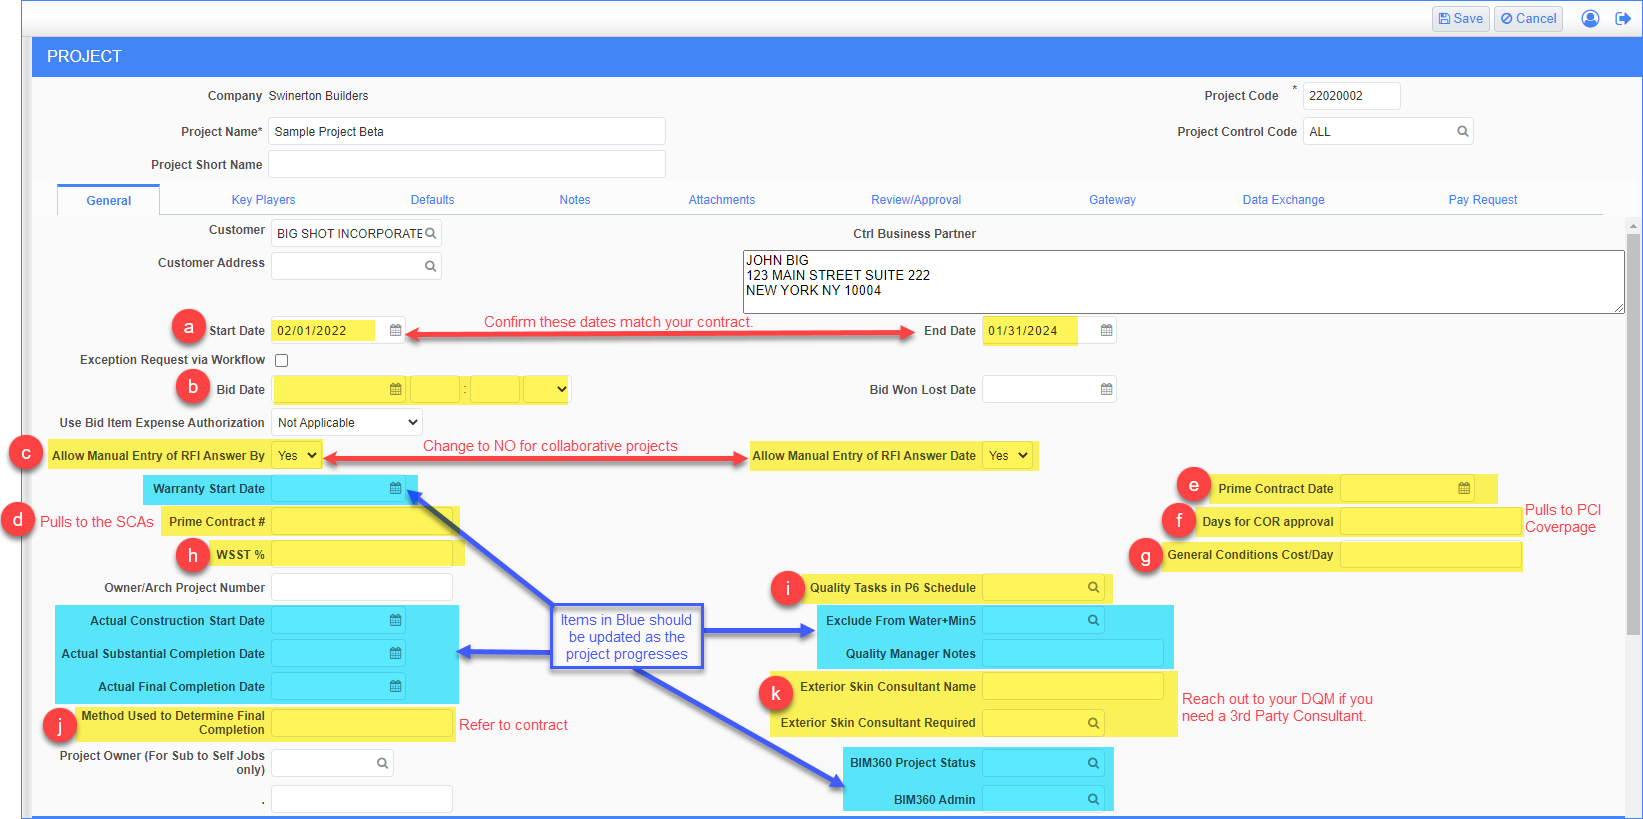
Project Maintenance Set Up - GENERAL TAB
Project Maintenance Set Up - General, Notes & Attachments
OVERVIEW
This document is a guide to execute the Project Maintenance Defaults setup process. This is for ALL Projects.
Theses are Required Fields for WORD Outputs such, PCIs, OCOs and Subcontract Agreements to Populate Properly.
NOTE: Add your Project Team and the Architect to the Project Partner Directory first and identify the Primary Contact for each.
STEP 1: Click on the Project Name. The Project screen appears and defaults to the General Tab.
STEP 2: Click the Edit button in the upper right corner

STEP 3: Review and update content in the main section to match the executed contract.
-
Start Date and End Date: These will come over from the Job Start process, double check that these are still the correct original contract dates.
- Bid Date: Enter data if known. Get from estimating team as needed.
-
Allow manual Entry of RFI answer by & answer date: Default is Yes. Change to "NO" on collaborative projects where the Architect will be logging in CMiC to Answer RFIs.
- Prime Contract #: Input your Owners Contract number*.This is Very Important because this will populate a field in the subcontract that legally ties them to the Prime. If you do not have an actual number associated with your Prime Contract. Leave this field blank
- Prime Contract Date: Input your Owners Contract date.
- Days for COR Approval: Review contract. How long does the owner have to reply to a COR once submitted. This will populate on your PCIs/CORs.
-
General Conditions Cost/Day: Enter $ value here. If this is a fixed rate per contract be sure to use the negotiated amount.
-
WSST %: Washington State Sales Tax percentage. This will calculate the Sales Tax on your PCI/COR letters (Washington State only). Utilize PCIs Markups if you have City taxes that need to be added to your PCIs.
-
Quantity Tasks in P6 Schedule: Yes / No (should be Yes if a P6 schedule has been created)
-
Method Used to Determine Final Completion: Review contract to check for definition. If not there, then clarify with Owner EARLY in the project.
-
Exterior Skin Consultant: Enter name on contract documents if Owner/Architect has retained a consultant. Otherwise, reach out your DQM to get a 3rd Party Consultant onboard if there is ANY work associated with the Exterior Skin of the building.
NOTE: Items highlighted in Blue in the screenshot should be updated as the project progresses, and they become relevant.

STEP 4: Review and update content in the Project Address section as needed.
-
Contact Name: Enter in Project Manager’s name (DO NOT use the magnifying glass, just type the name). This will pull to your PCIs & OCOs
-
Street: Enter Street Address of your Project or Office
-
Suite: Enter Suite on your Project or Office (if applicable)
-
City: Enter City for your address
-
State/Province: Enter State for your address (use the magnifying glass to change)
-
Postal/Zip Code: Enter zip code of your address
-
Country: Enter USA
-
Phone: Enter phone of your address
-
Fax: Enter Fax of your address (if applicable)
-
Corresp. Address: Click the magnifying glass and choose your main office address.

STEP 5: Review and update content in the Project Description section as needed. This should pull from Cosential. Update to add detail or clarify Project's Scope of Work. Enter any Keywords for the project's SOW in the Keywords section.
STEP 6: Click Save in the upper right hand corner to complete the updated to the General Tab.

NEXT STEPS: Complete the Project Maintenance Set Up - KEY PLAYERS tab.
NOTE: If this is a Sub-To-Self Project, after the completion of this process, click HERE for additional information on setting the Project Defaults.
OTHER TABS:
-
Notes Tab: The Notes tab is an optional tab used to add “internal” notes applicable to the screen or module (object) you are working in. Click Add Note in the upper right to add applicable notes.

-
Attachments Tab: The Attachments tab is used to attach documents, drawings, pictures etc. applicable to the screen or module (object) you are working in. For Project Maintenance, you may consider attaching the job start order, recap of contract highlights, Executed Prime Contract, etc for the project in this tab. Click on Upload Multiple to add documents to this tab.
