Manually add a Submittal in CMiC
Manually Add a Submittal in CMiC
OVERVIEW: HOW TO CREATE ANTICIPATED SUBMITTALS MANUALLY THROUGH THE SUBMITTAL MODULE
This document is a guide for how to create anticipated submittals using the Submittals object in CMiC. There are three ways to create anticipated submittals within CMiC. They are:
1. Using Excel to enter all information and then import it into the system. See the Submittal Import solution for more information.
2. Using the Submittal Package object to create individual anticipated submittals contained within a package number. See the Submittal Package solution for more information.
3. Using the Submittal object to create individual anticipated submittals. This How-To will teach you how to use the Submittals object to create your anticipated submittals.
SUBMITTALS:
STEP 1: Login to CMiC.
STEP 2: Select your project.
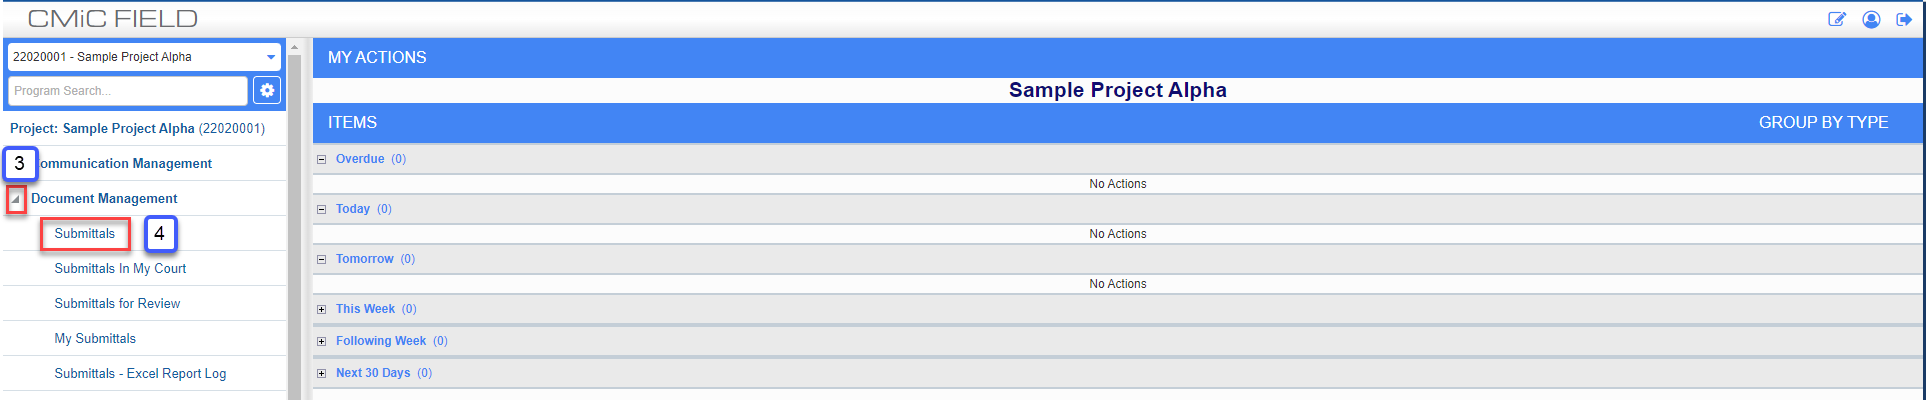
STEP 3: Click the Arrow (4) sign to the left of Document Management.
STEP 4: Click the Submittals link.
STEP 5: Click the Add Submittal button on the top right of the screen (this will bring you into the Edit mode).
a. Submittal No.: Auto-fills
b. Name: Type a short description of your anticipated submittal.
c. Type: Use the drop-down arrow and select from list, i.e., Data, Shop Drawings, Calculations, etc.
d. Status: Auto-fills with Open; Use the drop-down arrow and select “Anticipated” or tab into the field and press the letter “A” to populate the “Anticipated” Status. You can use the arrow buttons on your keyboard to scroll through the other statuses alphabetically if you desire.
e. Critical Procurement Item: If you wish to flag a submittal as a critical procurement item, check this box.
f. Create Link Button: If this submittal is associated with a Change and a PCI needs to be created for tracking purposes, click on button and fill in the required information. See separate link to complete the needed information.
g. Link to Change Button: If this submittal is associated with a Change and a PCI has been created, click on button and link for tracking purposes.
h. Description: If the description of the anticipated submittal was not sufficient, use this box to type a detailed description of the anticipated submittal.
i. Spec Section: Type the spec section OR use the Magnifying Glass to select the spec section from a list of values. This information MUST be entered to maintain the integrity of the submittal numbering system.
j. Package No.: Leave blank. Refer to SwinNet / CMiC / Document Management / Submittal Packages – Create Anticipated “How to create anticipated submittals manually through the package module” document for more information on what this field.
k. Spec Sub-Section: Type the spec sub-section OR use the Magnifying Glass to select the spec sub-section from a list of values.
User Defined:
l. Other Submittal Type: Leave blank unless you select type “other” in step 5.c, then type in description.
m. Quality Submittal Type: Use the magnifying Glass and select from list, i.e., Project Kick-off, Bldg Env. Review, Pre-install Mtg., etc.
n. Area: Type a short description for the area that this submittal is specific to.
o. QM Reviewer: Use the magnifying Glass and select from list of Swinerton/HMH Quality Managers. If the anticipated submittal is highly technical, it may require a Swinerton/HMH employee with special knowledge to review the actual submittal. Use this button to select the Swinerton/HMH employee that will review your submittal for Quality Management purposes. An example might be your exterior waterproofing or structural steel shop drawings.
p. Water+Min5: Use the magnifying Glass and select from list, i.e., Yes, No, etc.
Sender:
q. Prepared By: (Subcontractor) Use the Magnifying Glass to select the Subcontractor company name from a list of values.
r. Contact: (Subcontractor) Use the Magnifying Glass to select the Subcontractor contact name from a list of values.
s. Transmitted For: Use the drop-down arrow and select from list, i.e., Approval, Information Only, Selection, Clarification, etc.
t. Required Finish: The required date that the submittal is to be returned to the subcontractor.
u. Approval By: (Architect) Auto-fills if set up in Project Maintenance / Default tab or use the Magnifying Glass to select the Architect company name from a list of values.
v. Contact: (Architect) Auto-fills if set up in Project Maintenance / Default tab or use the Magnifying Glass to select the Architect contact name from a list of values.
w. cc: Click on the Edit button, click on the Magnifying Glass to select the contact name or Distribution List from a list of values and click OK. Repeat as needed.
NOTE: Be sure to setup your Submittal Distribution List to quickly add all necessary contacts.
Schedule:
y. Activity ID: (this feature is not being used at this time)
z. Due Onsite: Click on the calendar ICON and select the date that this material is due onsite.
aa. Variance: Auto-fills based on the number of days input for Float (resubmittal).
bb. Current Cycle: Auto-fills based on the cycle of review, 1= original, 2 = resubmittal, etc.
cc. Ball-in-court: Who has the current responsibility of the submittal.
dd. Fabricated: For tracking purposes, if field is Yellow, the submittal has not been approved, once approved the field will turn white, click on the calendar and input the fabricated date.
ee. Delivered: For tracking purposes, once the Fabricated date is input the Delivered field will open (turn from yellow to white) and click on the calendar and input the anticipated delivery date.
ff. Arrived: For tracking purposes, once the Delivered date is input the Arrived Onsite field will open (turn from yellow to white) and click on the calendar and input the actual date material arrived onsite.
NOTE: The dates below will auto-fill based on the above Due Onsite Date if the Project page / Default tab / "Submittal Lead Time in Days" section has been completed. The default dates and lead times can be overridden here. Also, in the "Submittal Lead Time in Days" section there is a checkbox for “Use Working Days”. If box is checked then the following dates are calculated based on a 5-day work week. If box is unchecked, then the following dates are calculated on calendar days.
NOTE: All fields listed below are tied together. In order for dates to populate, you must enter Lead Times for each item, even if the Lead Time is zero. Also, adjusting one Lead Time duration will automatically adjust the other dates accordingly.
gg. Submitted by Contractor: Auto-fills, the date the Subcontractor is to submit the submittal to Swinerton/HMH.
hh. Internal Review – enter number of days for internal review.
ii. Sent for Review: The date Swinerton/HMH to submit to the Architect,
jj. External Review – enter number of days for Architect review. This duration may be defined in the project’s prime contract, or as agreed to with the Architect.
kk. Returned from Review: The date the Architect is to return the submittal.
ll. Final Review - amount of time Swinerton/HMH has to review the approval submittal before issuing to subcontractor.
mm. Forwarded to Contractor - The amount of float you have in your schedule for a given submittal. It may include time for resubmitting part or all of this submittal.
nn. Float (resubmittal) - amount of time you want to allow for float of subcontractor to resubmit part or all of the submittal.
oo. Fabrication: The date fabrication is to begin time after approval of the submittal.
pp. Lead Time - enter number of days for fabrication of materials.
qq. Delivery: This is when the submitted material is scheduled to ship to the jobsite.
rr. Lead Time – Enter zero or delivery time needed to the jobsite once fabrication is complete.
ss. Onsite: This is when the submitted material is scheduled to arrive onsite for installation. 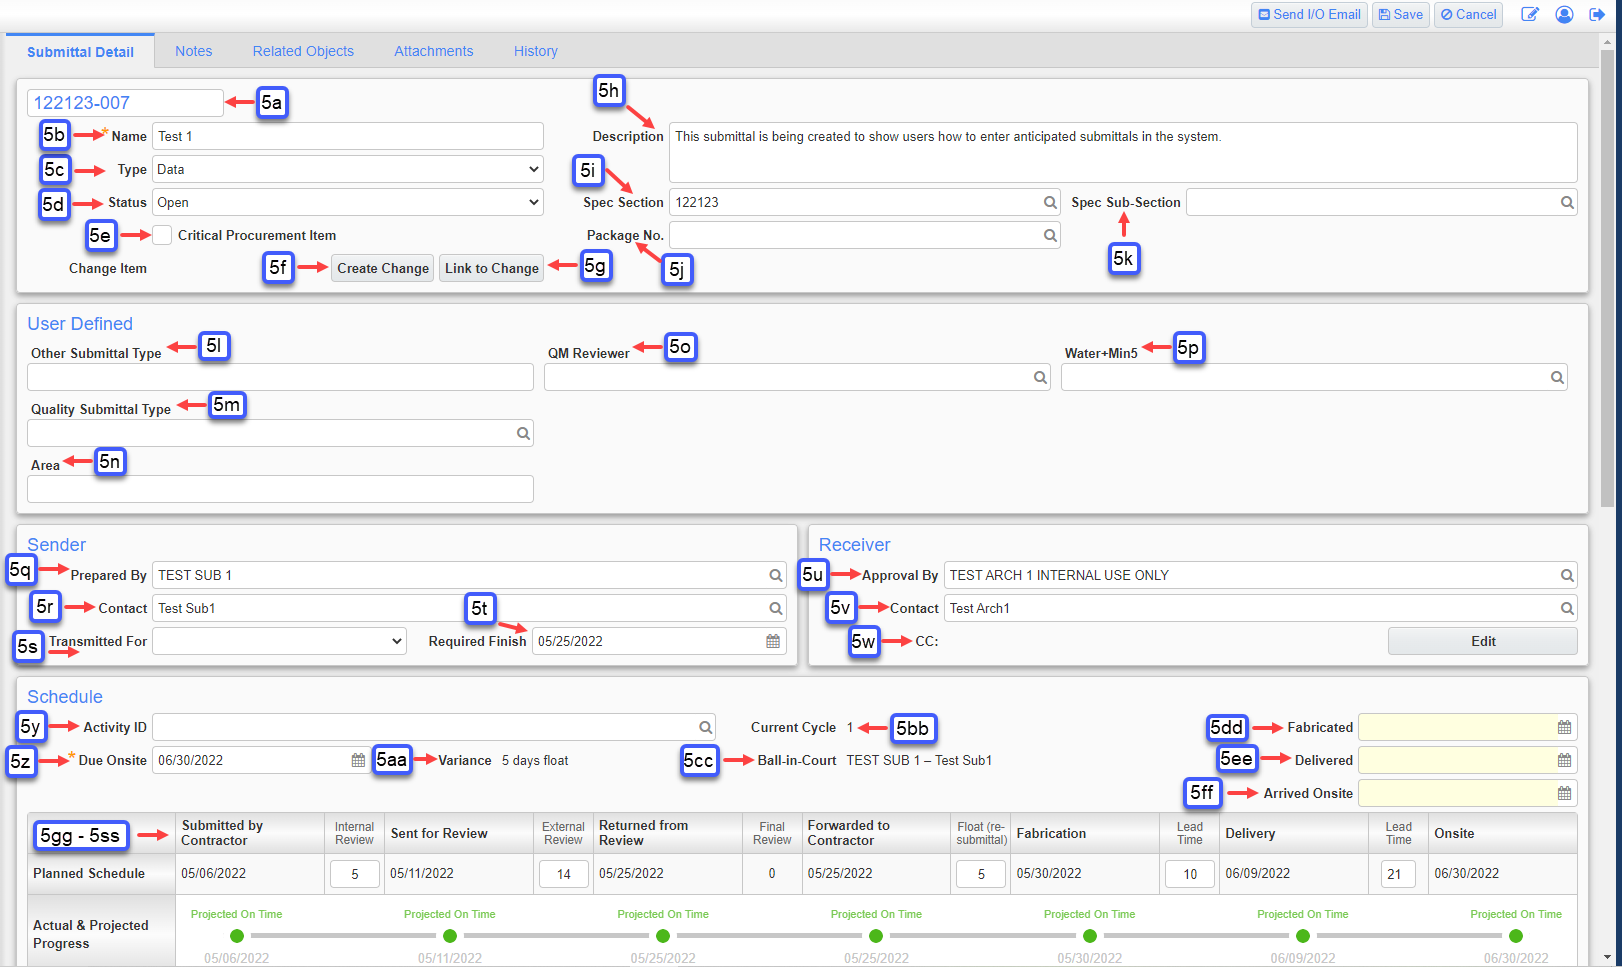
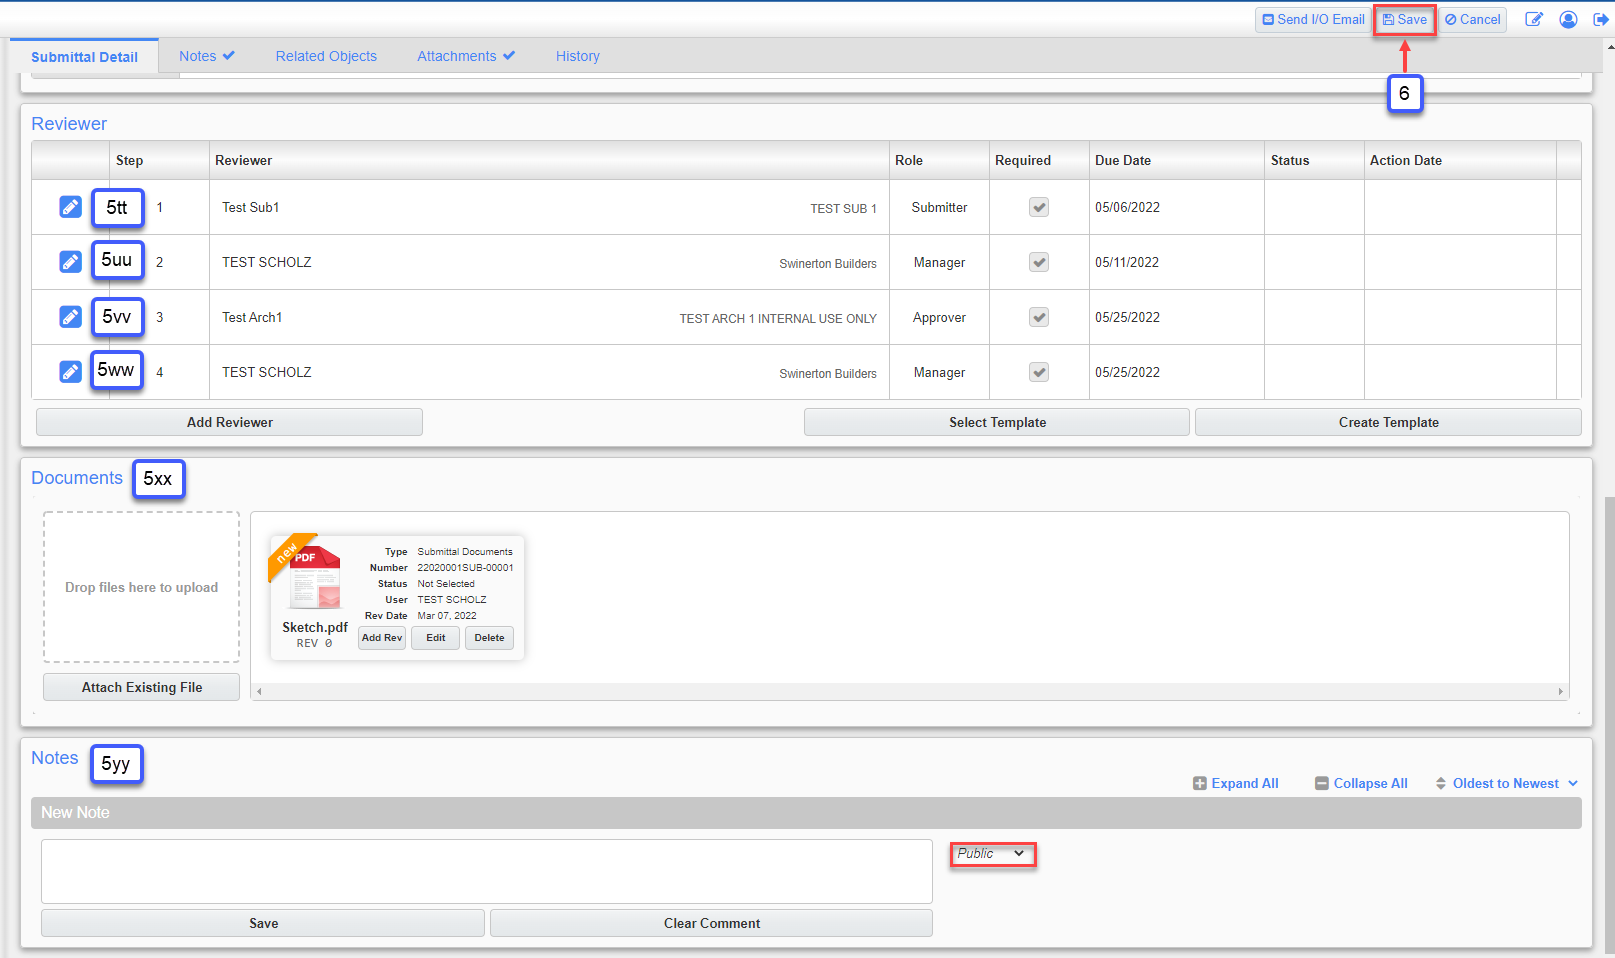
Reviewer: (Note: Items can be changed by clicking on the Pencil Icon to the left of the respective row and making the necessary adjustments below in Reviewer Details and clicking Save Reviewer Details. This can also be done by clicking on the Edit History (Step 7, see below) action button at the top.)
tt. Step 1: The Subcontractor is to submit the submittal to Swinerton/HMH.
1. Reviewer - (Subcontractor) Auto-fills from Company information entered in step 5.q, and Contact information entered in step 5. r.
2. Role - this information auto-fills, Submitter
3. Due Date – this information auto-fill from the above Schedule section. Enter the date the submittal needs to be received from the Subcontractor if it did not auto-fill.
4. Status - current status of submittal, click on drop down arrow and select appropriate Review Response.
5. Action Date - date when respective activities took place.
uu. Step 2: Swinerton/HMH to submit the submittal to the Architect.
1. Reviewer - this information auto-fills, contact at Swinerton/HMH to review submittal
2. Role - this information auto-fills, Manager
3. Due Date – this information will auto-fill from the above Schedule section. If you didn’t use Schedule section above, you will enter this information when you process the actual submittal.
2. Status - current status of submittal, click on drop down arrow and select appropriate Review Response.
3. Action Date - date when respective activities took place.
vv. Step 3: The date the Architect is to return the submittal to Swinerton/HMH .
1. Reviewer - (Architect) Auto-fills if set up in Project Maintenance / Default tab or if Magnifying Glass is used to select Architect in step 5.u and Architect contact in 5.v.
2. Role - this information auto-fills, Approver
3. Due Date – this information will auto-fill from the above Schedule section. If you didn’t use Schedule section above, you will enter this information when you process the actual submittal.
4. Status - current status of submittal, click on drop down arrow and select appropriate Review Response.
5. Action Date - date when respective activities took place.
ww. Step 4: The date Swinerton/HMH to return the submittal to the subcontractor. It may require resubmitting part or all of this submittal.
1. Reviewer - this information auto-fills, contact at Swinerton/HMH to review submittal
2. Role - this information auto-fills, manager
3. Due Date - the calculated date Swinerton/HMH is to return the submittal to the subcontractor.
2. Status - current status of submittal, click on drop down arrow and select appropriate Review Response.
3. Action Date - date when respective activities took place.
xx. Documents: Drag and drop documents/attachments from folders, can also be tracked in the Attachments tab.
yy. Notes: Type notes and memos as needed, toggle between Public (all to see) and Private (internal notes only), and click save.
STEP 6: Click the Save button on the top right of the screen.
NOTE: Once you have saved, the History section of the Anticipated submittal will become visible. To edit information in this section, you must click the Edit History button.
STEP 7: Click the Edit History button.
First Row – Received:
a. Received Due Date: This information auto-fill from the above Schedule section. Enter the date the submittal needs to be received from the Subcontractor if it did not auto-fill.
b. Received Action Date: Leave blank, you will enter date when you process the actual submittal.
c. Days Diff: Auto-fills.
d. Received From: Auto-fills Subcontractor company name or use the Magnifying Glass to select.
e. Contact: Auto-fills Subcontractor contact name or use the Magnifying Glass to select.
f. To: Auto-fills Swinerton/HMH company name or use the Magnifying Glass to select.
g. Contact: Auto-fills Swinerton/HMH contact name or use the Magnifying Glass to select.
h. Status: Use the Magnifying Glass to select the status of “Anticipated”. You may change this to “Received” once the submittal is received from the Subcontractor.
i. Comment: Leave blank. This does not update or change the Comment that can be entered on the Submittal Detail.
Second Row – Sent:
j. Sent Due Date: This information will auto-fill from the above Schedule section. If you didn’t use Schedule section above, you will enter this information when you process the actual submittal.
k. Sent Action Date: Leave blank, you will enter date when you process the actual submittal.
l. Days Diff: Auto-fills once Action date has been filled out.
m. Sent From: Auto-fills Swinerton/HMH company name.
n. Contact: Auto-fills Swinerton/HMH contact name.
o. To: Auto-fills Architect company name or use the Magnifying Glass to select.
p. Contact: Auto-fills Architect contact name or use the Magnifying Glass to select.
r. Comment: Leave blank.
Third Row – Returned:
s. Returned Due Date: This information will auto-fill from the above Schedule section. If you didn’t use Schedule section above, you will enter this information when you process the actual submittal.
t. Returned Action Date: Leave blank, you will enter date when you process the actual submittal.
u. Days Diff: Auto-fills once Action date has been filled out.
v. Returned From: Auto-fills Architect company name.
w. Contact: Auto-fills Architect contact name.
x. Returned To: Auto-fills Swinerton/HMH company name.
y. Contact: Auto-fills Swinerton/HMH contact name.
aa. Comment: Leave blank.
Fourth Row – Forwarded:
bb. Forwarded Due Date – This information will auto-fill from the above Schedule section. If you didn’t use Schedule section above, you will enter this information when you process the actual submittal.
cc. Forwarded Action Date: Leave blank, you will enter date when you process the actual submittal.
dd. Days Diff: Auto-fills once Action date has been filled out.
ee. Forwarded From: Auto-fills Swinerton/HMH company name.
ff. Contact: Auto-fills Swinerton/HMH contact name.
gg. Forwarded To: Auto-fills Subcontractor company name.
hh. Contact: Auto-fills Subcontractor contact name.
jj. Comment: Leave blank.
kk. Click the Save button on the top right of the screen.
ll. Click the Close button to close the Edit History screen.
NOTE: At this point you have successfully created one anticipated submittal. In order to create the rest of your anticipated submittals, proceed using the steps listed below. You have three options to add the rest of your anticipated submittals:
1. Add – If you choose to use the Add button, your screen will refresh and you will complete steps 1-7 as noted above for the new anticipated submittal. This is effective, but is not the fastest method.
2. Import – If you choose to use the Import button, you will need to follow instructions on the Importing your Submittals Solution.
3. Copy – This is the most efficient method for creating new anticipated submittals once the first anticipated submittal has been created. Follow the instructions below for using the Copy button.

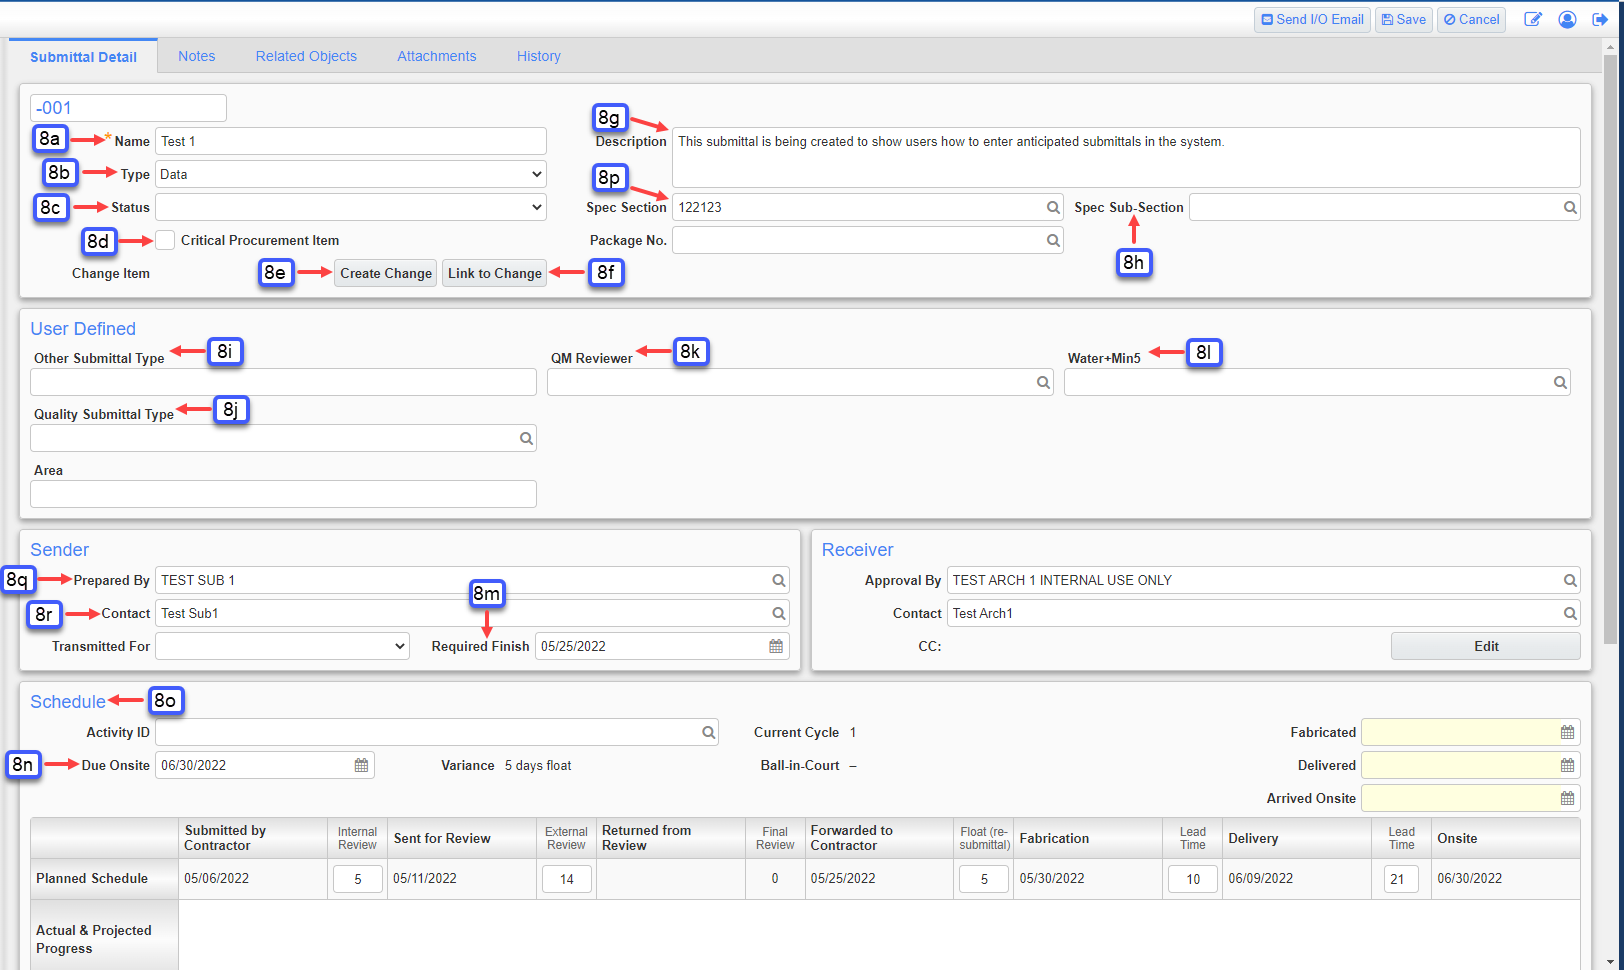
STEP 8: Click the Copy button. The screen will refresh into “edit” mode and you will be working on a new anticipated submittal number as referenced by the Submittal No field. Change any information that requires updating from the previous anticipated submittal. Often times, fields that will change from submittal to submittal are:
a. Name: change the name/description to match the new anticipated submittal
b. Type: change the type to match the new anticipated submittal
c. Status: Change to anticipated.
d. Critical Procurement Item: If you wish to flag a submittal as a critical procurement item, check this box.
e. Create Link Button: If this submittal is associated with a Change and a PCI needs to be created for tracking purposes, click on button and fill in the required information. See separate link to complete the needed information.
f. Link to Change Button: If this submittal is associated with a Change and a PCI has been created, click on button and link for tracking purposes.
g. Description: change the description to match the new anticipated submittal.
h. Spec-Sub-Section: change the spec sub-section to match the new anticipated submittal
i. Other Submittal Type: (if applicable)
j. Quality Submittal Type: (if applicable)
k. QM Reviewer: (if applicable)
l. Water+Min5: (if applicable)
m. Required Finish: change the required finish date to match the new anticipated submittal (don’t forget this field auto-fills based on information filled out in the “Schedule” section, but it can always be manually entered here.
n. Due onsite: change the required due onsite date to match the new anticipated submittal (don’t forget this field auto-fills based on information filled out in the Schedule section, but it can always be manually entered here.
o. Schedule (ALL FIELDS): change ALL lead times as needed for this section to auto-populate the date fields for the new anticipated submittal.
NOTE: Each time you begin creating anticipated submittals for a new spec section, you will also want to change the following fields:
p. Spec Section: change the spec section if you are entering a new anticipated submittal for a new spec section
q. Prepared By: change the Subcontractor company name to match the spec section you are working in.
r. Contact: change the Subcontractor contact name to match the Prepared By company name.
NOTE: At this point, you have created anticipated submittals using the Submittals object. Once all anticipated submittals have been created, it is possible to group certain submittals into a submittal package, which will allow you to submit multiple items at one time. Refer to the Creating Submittal Packages Solution for instructions on how to create packages.