Add a New Phase / Category via PCI
Add a New Phase / Category via PCI
OVERVIEW
After your budget has been locked by your Financial Manager, new phase and category codes (and any associated budget values) can only be added via a PCI. If your budget has not yet been locked, new phases and categories can be added via bid items (Click HERE to go to the how-to guide).
The example below shows how to do this is a dedicated PCI but it can be done in ANY unposted PCI.
Click HERE to view Adding a PCI Part 1: PCI Header, then complete the following steps.
Click HERE to view Labor Productivity - Add a New Phase / Category via PCI
Setup Notes:
- The PCI Type will be No Change To Owner
- You can enter it as PCI #0000 and call it Adding Phase Codes. Then just leave the PCI as Unposted so if you need to add other Phase/Category codes later you can use the same PCI #. You will need to change the numbering BEFORE you save it for the first time
-
Status should be Approved
-
Description: Added phase codes
- Click Save
STEP 1: Click Edit button at the top of the screen and scroll down to the PCI Details section
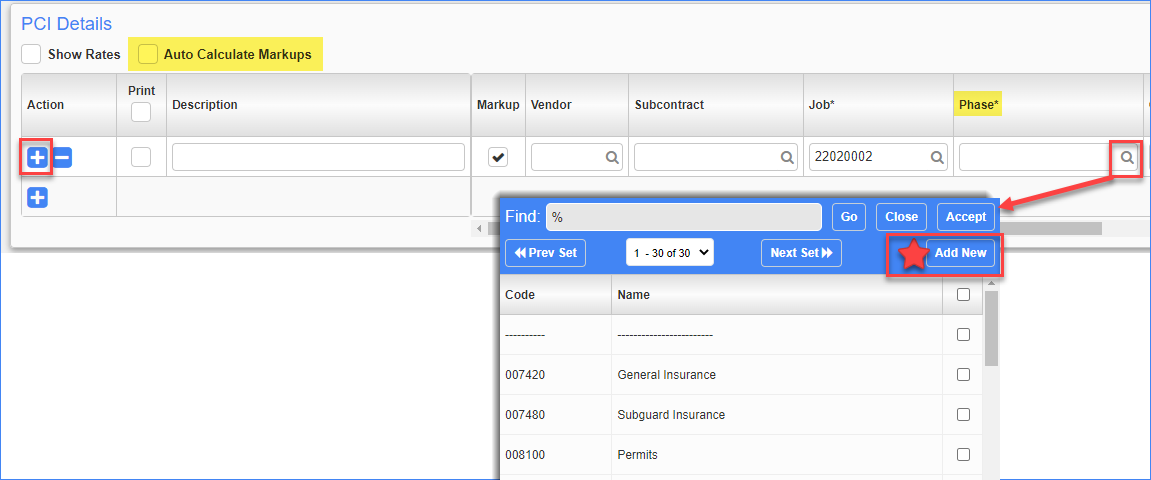
STEP 2: Uncheck the "Auto calculate markups" box
STEP 3: Click (+) button to add a new row
STEP 4: Click the magnifying glass in the Phase field
STEP 5: In the pop-up window, click Add New

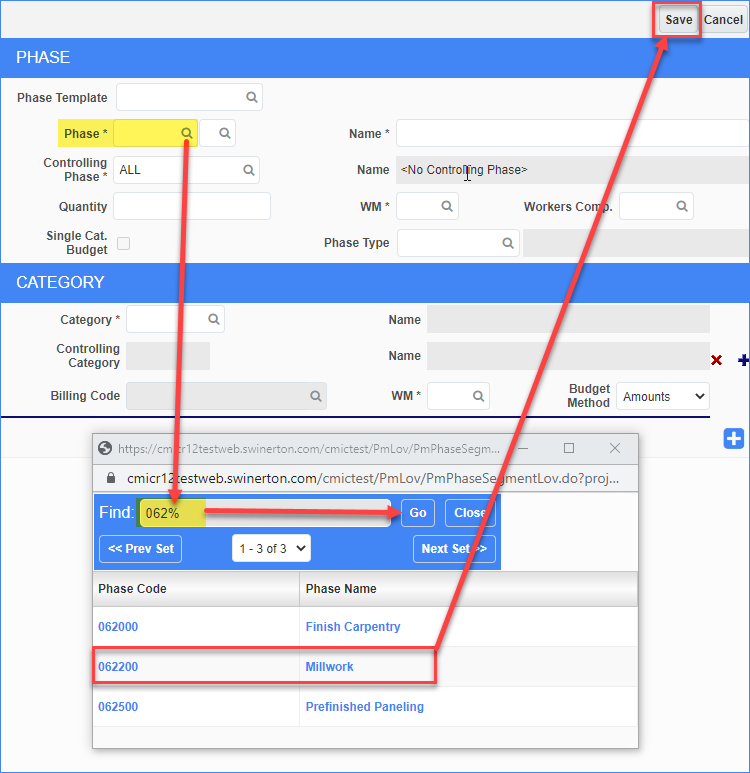
STEP 6: Click the magnifying glass in the Phase field
STEP 7: In the popup, type part or all of the Phase Name or Code in the Find field and click enter or Go (Ex. %Millwork%, or 062%)
STEP 8: Review the options and click the Phase Name you want. the popup window will close

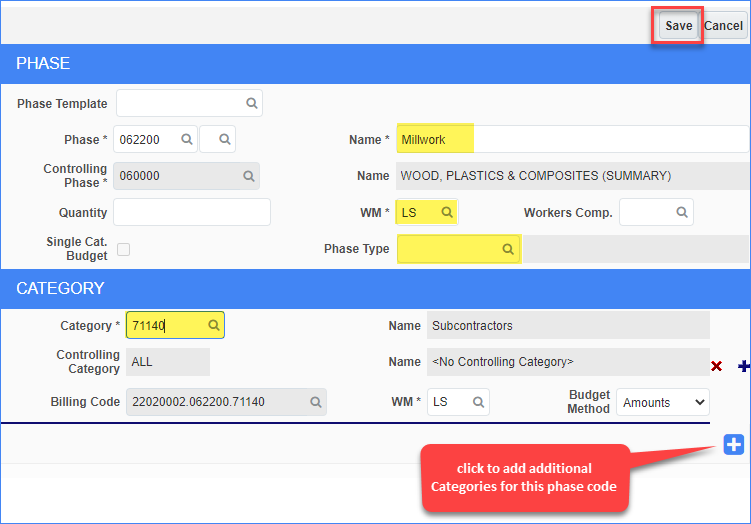
STEP 9: Optional - you can change the Name of the phase code if needed. Use best practices per the Assign Phase Codes function. Note that this can also be done later.
STEP 10: Click the magnifying glass in the WM field and choose LS (unless using Labor Productivity)
STEP 11: Click the magnifying glass in the Phase Type field to select the appropriate phase type. For subcontract codes this field will be blank. Click HERE to learn more about phase types.
STEP 12: Click the magnifying glass in the Category field and find the appropriate category code. Click HERE to learn more about available category codes.
STEP 13: If you have more than one category for your Phase Code, just click the (+) button to Insert a new section.
STEP 14: Click Save in the pop up window.

STEP 15: The new line item will now show on the PCI Details section and has been added to the job cost reports.
Repeat steps 3-14 as many times as needed throughout the duration of your project. When you are ready to close your project, change the status of the PCI to Cancelled since it is no longer needed.
STEP 16: Click Save in the PCI window to complete the update.

NOTE: Leave the PCI open until the end of the project in case you need to add additional line items.