Adding a PCI Part 1: PCI Header
Adding a PCI Part 1: PCI Header
Go to the Change Management page on SwinNet to view Best Practices for PCIs.
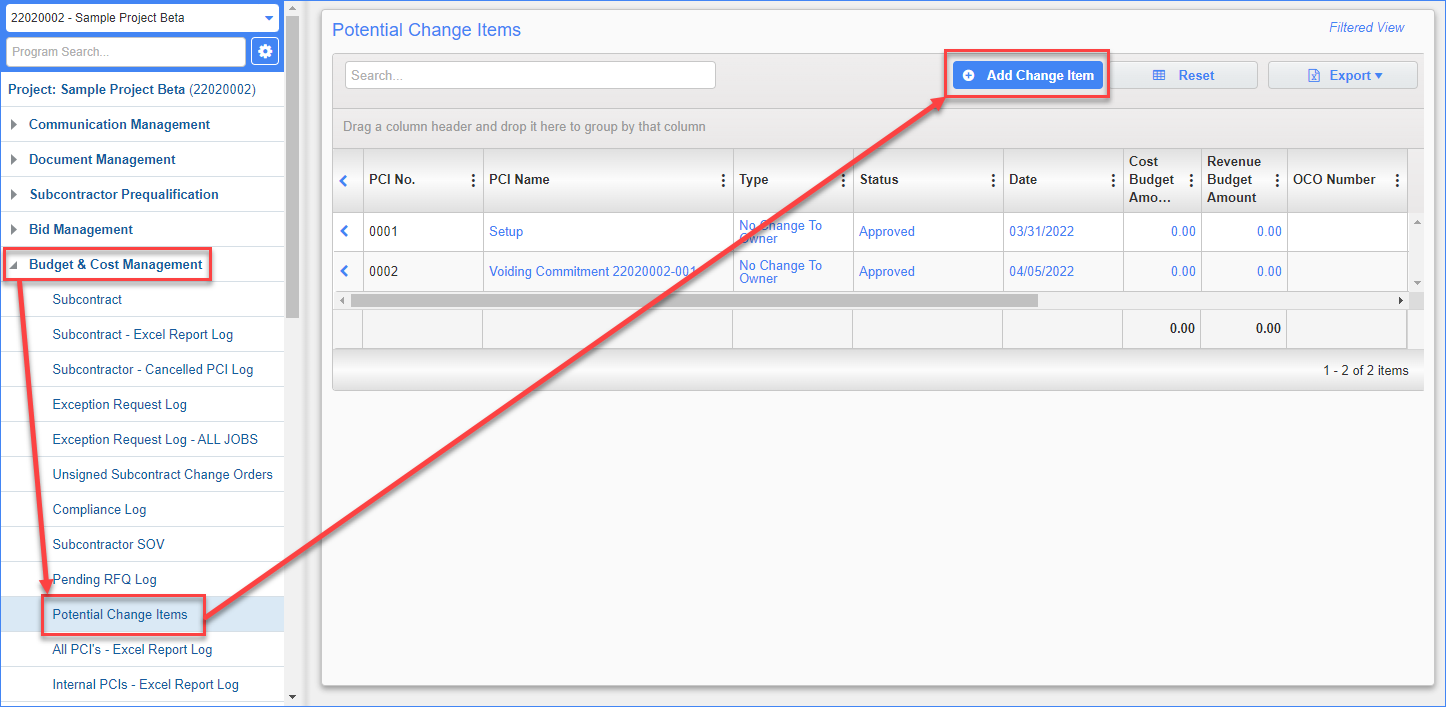
STEP 1: Click the arrow 4 next to for Budget & Cost Management.
STEP 2: Click Potential Change Items
STEP 3: Click the Add Change Item button in the upper right to create a NEW PCI

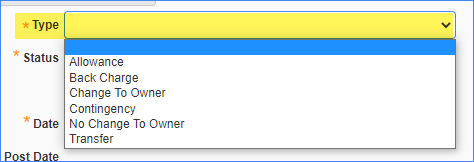
STEP 4: TYPE : There are 6 different Types of PCI's listed, select the one for this PCI.
Click here for more information on PCI Types

EXTERNAL: Both Cost Budget & Revenue Budget Can be Affected
- Change to Owner (CTO)
- Allowance (ALLO)
- Contingency (CONT)
- Transfer (TR) (Must Balance to Zero)
INTERNAL Only affects the Cost Budget
- No Change to Owner (NCTO)
- Back Charge (BC)
STEP 5: Once the PCI Type is selected, the PCI number will auto populate.
NOTE: DO NOT CHANGE IT. IF you do change it, maintain a 4 digit code to ensure proper sequencing. Example: use PCI 0054R1 in lieu of PCI 54R1.
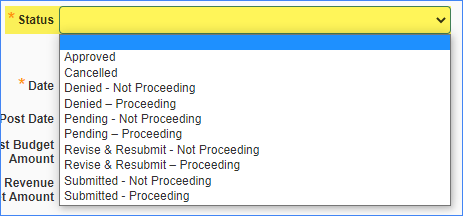
STEP 6: Select the Status of the PCI from the 10 options:
Approved = Owner has approved change for External Types. For internal, change to approve just before posting.
Cancelled = Issue is closed, no longer applicable. This will remove it from the forecasting. Do Not change any of the information in the PCI Details SOV.
Denied - Not Proceeding = Owner Denied. Swinerton is not pursuing the issue.
Denied - Proceeding = Owner Denied. Swinerton continues to pursue the issue.
Pending - Not Proceeding = Cost has not been submitted to the Owner. Not Proceeding with work in the field
Pending - Proceeding = Cost has not been submitted to the Owner. Proceeding with the work in the field
Revise & Resubmit - Not Proceeding = Cost submitted and Owner required revisions, in Swinerton's court. Not Proceeding with work in the field
Revise & Resubmit - Proceeding = Cost submitted and Owner required revisions, in Swinerton's court. Proceeding with the work in the field
Submitted - Not Proceeding = Cost has been submitted to the Owner. Not Proceeding with work in the field
Submitted - Proceeding = Cost has been submitted to the Owner. Proceeding with the work in the field
NOTEs:
For EXTERNAL PCIs it is critical this is updated. Box 3 of the PSR pulls information from this status. Click HERE to see PSR information.
If you have issued an advanced SCO, you have proceeded with the PCI since we are now at risk.

STEP 7: Once the status is entered the Proceed & Forecast boxes will populate accordingly. You cannot change these. If the PCI should not be including in the forecasting, utilize PCI Projections.
STEP 8: The Date field will auto populate with the day it was created.

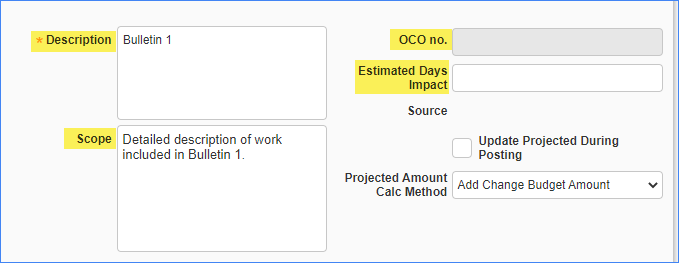
STEP 9: DESCRIPTION: This field is used for a Short Description of the issue.
STEP 10: SCOPE: This is the Long Description Field used to enter the Scope of Work for the PCI. (Double click in this field to open a larger dialog box.)
STEP 11: OCO No.: When a PCI is assigned to an OCO, this field will populate.
STEP 12: ESTIMATED DAYS IMPACT:
This is Number of Days impact to the project schedule due to this PCI including compensable and non-compensable delays. Review if your contract is working or calendar days to ensure the correct quantity is entered. This field will show in the OCO screen. Note that the days impact from this PCI should be for the subsequent activity. You will address critical path impact on the OCO. Visit the Delay Analysis page on SwinNet for more information on determining days impacted.

STEP 13: Complete the User Defined section:
- ORIGINATOR: Select the Appropriate Originator (Architect, Owner, Inspector, Existing Condition, Sub etc.)
-
OWNER DIRECTION: Select the Appropriate Owner Direction. Box 3 of the PSR pulls information from this status. Click HERE to see PSR information.
Default is "Notice Required" = The Owner has not yet been notified. Review your contract for notification requirements
Notified Awaiting Direction = Owner has been notified, but has not given direction.
Proceed while Pricing = Owner has given direction to proceed.
Proceed Under Protest = The Owner has directed Swinerton to Proceed but we have not agreed with the terms.
Do Not Proceed / Price = Owner has given direction to Not Proceed.
Do Not Proceed / Cancelled = Owner has decided not to proceed with the work.
Proceed at Risk / Internal = For Internal Types (NCTO / BC), always use this direction.
No Notice Required: Owner does not need to be notified of this PCI. This is rare but might be used for Contractor Controlled Contingencies.
Proceed on T&M: Owner has given direction to proceed on a T&M Basis
- RESUBMIT NUMBER: Use this field if you are resubmitting a change to the owner.
- CHANGE ORDER REQUEST NUMBER: Use this field if you are using additional change order request numbers. This is only a text field and will print on your COR letters.
- CATEGORY: Use this field if you are tracking issues by Category. This in only a text field.

STEP 14: Complete the Key Dates section:
- Start Date: Utilize the Start Date field to show When Field Work has started. PCI should be updated to one of the Proceeding Statuses.
- End Date: Utilize the End Date field to show When Field Work has ended
- Proposal Issued: Date Owner notified of a potential impact. For example, notification could be sent via an email with a Potential Impact Letter printed from CMIC, or via an email with a quote/proposal/estimate.
- Proposal Signed: Date that the Owner received your notification of potential impact. So, this should be the same as your Proposal Issued date. Please note that the Date entered into the Proposal Signed field will auto-populate as the header date on your Potential Impact Letter when you print it from CMIC.
- Change Issued: Date the PCI was issued. This is the "Submit Date" that shows up on the PCI Logs, as well as the printed Date at the top of each COR letter that you can print directly from your PCI. NOTE: PCIs are NOT official. To officially change the contract amount or schedule duration, an OCO must be executed.
- Change Signed: Date the PCI (COR letter) was executed.

STEP 15: Click the Save button to save your work.
NEXT STEPS: Click HERE to view PCIs Part 2: Enter the PCI Details & SOV.